
Interfacing LCD with Starter AVR
In this tutorial we'll look at how to interface different types of character LCD's to the starter AVR board.
Basic
Starter AVR board has female connector on board to connect LCD's directly.
So you just need to connect LCD to board as shown in hookup. We'll interface 16x1, 16x2 and 20x4 LCD's to starter board in this tutorial. Basically there is no any change in the connections for these different LCD's but we need to only do slight modification in the code, while initializing the LCD.
Refer 8051 LCD Tutorial for basics of character LCDs
Hookup

Code
Code for different types of LCD's is given below:
LCD 16x1
#include "lcd.h"
int main()
{
    /*Connect RS->PB0, RW->PB1, EN->PB2 and data bus to PORTC.4 to PORTC.7*/
    LCD_SetUp(PB_0,PB_1,PB_2,P_NC,P_NC,P_NC,P_NC,PC_4,PC_5,PC_6,PC_7);
    LCD_Init(1,16);
    LCD_DisplayString("Explore Embedded");
    while(1);
    return (0);
}
LCD 16x2
#include "lcd.h"
int main()
{
    /*Connect RS->PB0, RW->PB1, EN->PB2 and data bus to PORTC.4 to PORTC.7*/
    LCD_SetUp(PB_0,PB_1,PB_2,P_NC,P_NC,P_NC,P_NC,PC_4,PC_5,PC_6,PC_7);
    LCD_Init(2,16);

    LCD_DisplayString("Explore Embedded");
    LCD_DisplayString("Lcd 4-bit Mode");
    while(1);

    return (0);
}
LCD 20x4
#include "lcd.h"
int main()
{
    /*Connect RS->PB0, RW->PB1, EN->PB2 and data bus to PORTC.4 to PORTC.7*/
    LCD_SetUp(PB_0,PB_1,PB_2,P_NC,P_NC,P_NC,P_NC,PC_4,PC_5,PC_6,PC_7);
    LCD_Init(4,20);

    LCD_DisplayString("Explore Embedded\n");
    LCD_DisplayString("LCD 4-bit Mode\n");
    LCD_DisplayString("20 x 4 \n");
    LCD_DisplayString(":)  :O");

    while(1);

    return (0);
}
Demo
The images below shows 16x2, 16x1 and 20x4 LCD's interfaced with starter AVR.


16x1 LCD
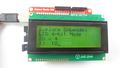
20x4 LCD


Downloads
Download the complete project folder from the below link:
https://github.com/ExploreEmbedded/ATmega32_ExploreStarterAvr/archive/master.zip
Have a opinion, suggestion , question or feedback about the article let it out here!