LPC1768: Timers
In this tutorial we are going to discuss the Timer module of LPC1768.
First we will see how to configure the Timer0 and Timer1 registers to generate delay of 100ms and 500ms respectively. At the end we will see how to use the ExploreEmdedded Timer library.
Contents
LPC1768 Timer Module
LPC1768 has four 32-bit independent timers (Timer0-Timer3). Each timer has a 32-bit pre-scalar to generate wide range on delays.
Each timer has 4 match registers with which 4 different delays can be generated using a single timer.
LPC7168 Timer Registers
The below table shows the registers associated with LPC1768 Timer module.
| Register | Description |
|---|---|
| IR | Interrupt Register: The IR can be read to identify which of 6(4-match, 2-Capture) possible interrupt sources are pending. Writing Logic-1 will clear the corresponding interrupt. |
| TCR | Timer Control Register: The TCR is used to control the Timer Counter functions(enable/disable/reset). |
| TC | Timer Counter: The 32-bit TC is incremented every PR+1 cycles of PCLK. The TC is controlled through the TCR. |
| PR | Prescalar Register: This is used to specify the Prescalar value for incrementing the TC. |
| PC | Prescale Counter: The 32-bit PC is a counter which is incremented to the value stored in PR. When the value in PR is reached, the TC is incremented. |
| MCR | Match Control Register: The MCR is used to control the reseting of TC and generating of interrupt whenever a Match occurs. |
| MR0-MR3 | Match Registers: The Match register values are continuously compared to the Timer Counter value. When the two values are equal, actions can be triggered automatically. The action possibilities are to generate an interrupt, reset the Timer Counter, or stop the timer. Actions are controlled by the settings in the MCR register. |
Register Configuration
| TCR | ||
|---|---|---|
| 31:2 | 1 | 0 |
| Reserved | Counter Reset | Counter Enable |
Bit 0 – Counter Enable
This bit is used to Enable or Disable the Timer Counter and Prescalar Counter
0- Disable the Counters
1- Enable the Counter incrementing.
Bit 1 – Counter reset
This bit is used to clear the Timer counter and PWM Prescalar Counter values.
0- Do not Clear.
1- The Timer Counter and the Prescaler Counter are synchronously reset on the next positive edge of PCLK.
| MCR | ||||||||||||
|---|---|---|---|---|---|---|---|---|---|---|---|---|
| 31:21 | 11 | 10 | 9 | 8 | 7 | 6 | 5 | 4 | 3 | 2 | 1 | 0 |
| Reserved | MR3S | MR3R | MR3I | MR2S | MR2R | MR2I | MR1S | MR1R | MR1I | MR0S | MR0R | MR0I |
MRxI
This bit is used to Enable or Disable the Timer interrupts when the TC matches MRx (x:0-3)
0- Disable the Timer Match interrupt
1- Enable the Timer Match interrupt.
MRxR
This bit is used to Reset TC whenever it Matches MRx(x:0-3)
0- Do not Clear.
1- Reset TC counter value whenever it matches MRx.
MRxS
This bit is used to Stop TC and PC whenever the TC matches MRx(x:0-3).
0- Disable the Timer stop on match feature
1- Enable the Timer Stop feature. This will stop the Timer whenever the TC reaches the Match register value.
Prescalar Calculation
Timer delay generated by the LPC1768 depends on the input clock and the pre-scalar values. The required pre-scalar value can be determined by the pclk (peripheral clock). PCLKSEL0 and PCLKSEL1 register have the PCLK info for all the 4 timers.
| Timer | PCLKSELx | Bits | Symbol | Description |
| Timer0 | PCLKSEL0 | 3-2 | PCLK_TIMER0 | Peripheral clock selection for TIMER0. |
| Timer1 | PCLKSEL0 | 5-4 | PCLK_TIMER1 | Peripheral clock selection for TIMER1. |
| Timer2 | PCLKSEL1 | 13-12 | PCLK_TIMER2 | Peripheral clock selection for TIMER2. |
| Timer3 | PCLKSEL1 | 15-14 | PCLK_TIMER3 | Peripheral clock selection for TIMER3. |
Getting the PCLK value.
Using the 2-bit information from PCLKSELx registers the pclk can be determined as below..
| PCLKSELx bits | PCLK |
| 0 | SystemCoreClock/4 |
| 1 | SystemCoreClock |
| 2 | SystemCoreClock/2 |
| 3 | SystemCoreClock/8 |
Calculating the Pre-scalar value.
After getting the pclk value the prescalar count for 1us delay can be calculated as below.
Timer Working
Steps to Configure Timer
- Power On the Timer module by setting the appropriate bits in PCONP register.
- Configure MCR to reset the TC and generate the interrupt whenever it matches MRx.
- Set the pre-scalar value for 1us.
- Update the MRx register with required delay in micro secs.
- Configure TCR to enable the Counter for incrementing the TC.
- Enable the required timer interrupt.
- Configure the GPIO pins as output for blinking the LEDs.
- Toggle the LEDs in ISR whenever the interrupt is generated.
Example
Program to demonstrates the led blinking with 100ms and 500ms delay using the timer interrupts
Using ExploreEmbedded Libraries
In the above tutorial we just discussed how to configure and use the Timer module of LPC1768 to generate 100ms and 500ms delay
Once you know the internals of LPC7168 Timers, you can directly use the ExploreEmbedded libraries to generate the required Delays.
The below sample code shows how to use the ExploreEmbedded Timer library.
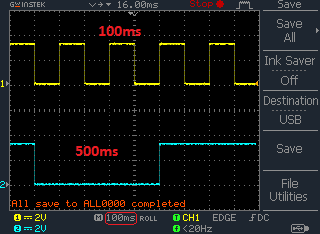
Timer Delay measured using CRO.

Downloads
Download the complete project folder from the below link:
https://codeload.github.com/ExploreEmbedded/Explore-Cortex-M3-LPC1768-Stick-DVB-14001/zip/master
Have a opinion, suggestion , question or feedback about the article let it out here!

